
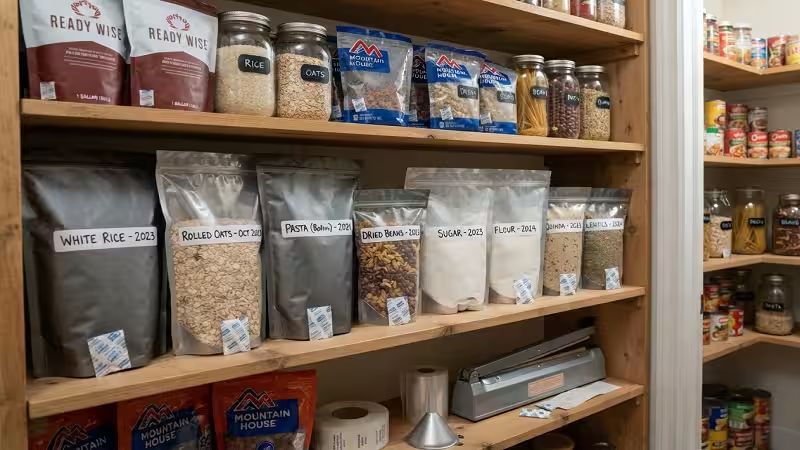
Grocery prices keep climbing, and storms, power outages, and job uncertainty remind us how fragile our food supply can feel. That’s why more American households are turning to long-term food storage as a practical form of self-reliance. Building a pantry that lasts isn’t about fear; it’s about peace of mind.
If you’ve started researching this topic, you’ve probably noticed one product mentioned again and again: mylar bags. These shiny, durable pouches have become the gold standard for preserving rice, beans, flour, and countless other staples for years, sometimes decades, at a time. However, not all bags are created equal, and choosing the wrong one can quietly ruin your entire storage plan.
This guide breaks down everything you need to know about finding the best mylar bags for long-term food storage. We’ll cover mil thickness, proper sealing techniques, and how to use mylar bags and oxygen absorbers together for maximum shelf life. Additionally, you’ll get a clear comparison table, a list of common mistakes to avoid, and an honest industry opinion on why cutting corners with cheap bags often costs more in the long run. By the end, you’ll know exactly which long-term food storage bags fit your household’s needs.
2. What Are Mylar Bags and Why They Matter for Food Storage
2.1 What Makes Mylar Different From Regular Plastic Bags
Mylar bags are not your average kitchen storage bags. They’re made from a metalized polyester film, which means a thin layer of aluminum is bonded to a durable plastic base. This combination gives mylar a unique advantage: it blocks light, oxygen, and moisture far more effectively than standard plastic ever could. Consequently, food sealed inside stays fresher for a much longer period.
Regular plastic bags are porous at a microscopic level, allowing tiny amounts of air and moisture to seep through over time. Mylar, on the other hand, acts almost like a suit of armor for your food. Because of this barrier property, it’s become the go-to choice for preppers, homesteaders, and everyday families building a reliable pantry.
2.2 The Role of Mylar Bags in Long-Term Food Storage
When you combine mylar with the right techniques, you create an environment where food can realistically last 10, 20, or even 30 years. That’s the real power behind long-term food storage bags: they don’t just hold food, they protect it from the exact elements that cause spoilage.
Light exposure breaks down nutrients. Moisture invites mold and bacteria. Oxygen speeds up oxidation and attracts pests. Mylar bags address all three threats simultaneously, which is why they consistently outperform basic storage containers for shelf-stable staples like grains, legumes, and powdered goods.
3. Understanding Mil Thickness: Why It Makes or Breaks Your Storage
3.1 What “Mil” Actually Means
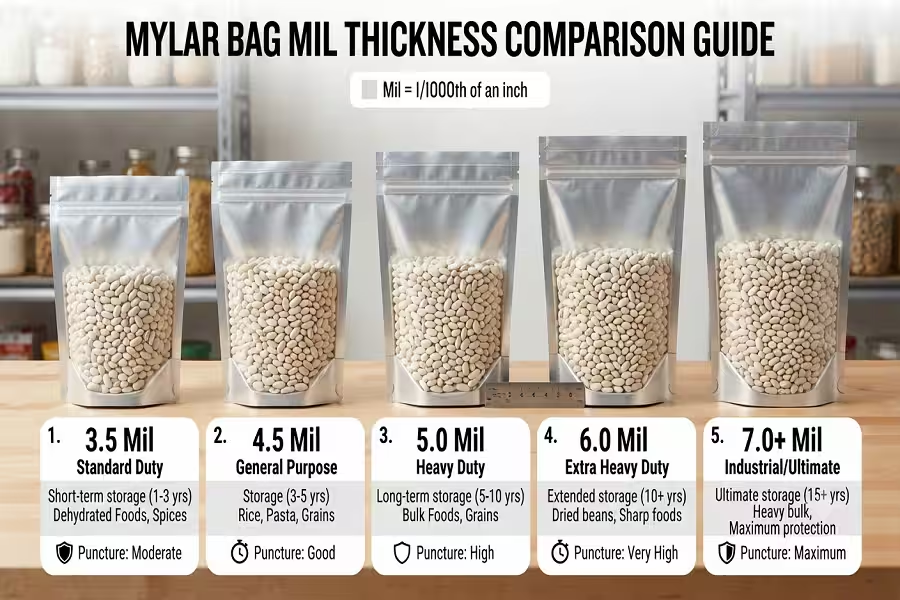
If you’ve shopped for mylar bags before, you’ve likely seen thickness listed in “mil.” One mil equals one-thousandth of an inch, which is a tiny but meaningful measurement. Although it sounds insignificant, this number determines how well your bag resists punctures, tears, and pest damage over time.
Think of it this way: a thicker bag is like a sturdier suitcase. It can handle bumps, shifts, and pressure without cracking open. A thinner bag, however, is more like a flimsy sandwich bag trying to hold canned goods. Eventually, something gives.
3.2 Recommended Mil Thickness by Use Case
For short-term storage or lightweight items, a 5 mil bag might suffice. However, for true long-term food storage bags meant to last years, most experts recommend at least 7 mil thickness. This range offers a solid balance between durability and cost for most households.
For serious preppers or bulk storage in basements, garages, or areas with rodent risk, 10 mil bags are worth the investment. These heavy-duty bags resist punctures far better and provide extra peace of mind against pests chewing through your supply. Ultimately, the thicker the mil, the more reliable your barrier against oxygen, moisture, and physical damage becomes. This is one of the most important factors when choosing the best mylar bags for long-term food storage.
4. How to Use Mylar Bags and Oxygen Absorbers (Step-by-Step)
4.1 Supplies You’ll Need
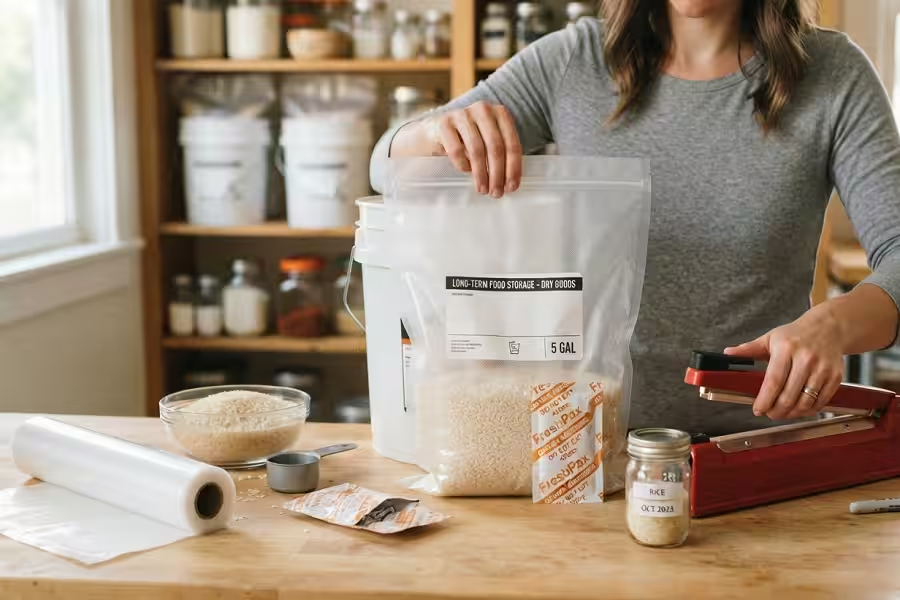
Before you get started, gather a few essential items: mylar bags, oxygen absorbers, a heat sealer or clothes iron, and a food-safe bucket for extra protection. You’ll also want a scale if you’re portioning food by weight, plus a permanent marker for labeling each bag with contents and packing dates.
Having everything ready beforehand makes the process smoother and helps you seal each bag quickly. This matters because oxygen absorbers start working the moment they’re exposed to air, so efficiency counts.
4.2 Step-by-Step Sealing Process
First, fill your mylar bag with your chosen food, leaving a few inches of empty space at the top. Next, drop in the appropriate number of oxygen absorbers based on bag size and food type. Then, press out as much excess air as possible before sealing.
Now comes the sealing step. Lay a thin cloth or piece of paper over the top edge, then run a hot iron or heat sealer slowly across the opening. Move steadily to create an even, airtight seal without melting through the bag. Afterward, check the seam carefully for gaps or bubbles.
Finally, let the bag sit for a few minutes to confirm the oxygen absorber is working. You’ll notice the bag pulling tight against the food as oxygen gets absorbed. This visual confirmation is one of the simplest ways to verify success. Learning how to use mylar bags and oxygen absorbers correctly truly is the foundation of successful long-term storage.
5. Best Mylar Bags for Long-Term Food Storage: Top Picks by Category
5.1 Best for Small Households
If you’re storing food for one or two people, quart-sized or gallon-sized mylar bags in 5 to 7 mil thickness usually work well. These smaller bags are easier to seal completely and let you portion food in manageable amounts. This reduces waste, since you’re not opening a massive bag just to grab a cup of rice.
Smaller bags also make organization simpler. You can stack them neatly in bins or totes without dealing with bulky, oversized pouches that are harder to store in tight spaces like closets or apartment pantries.
5.2 Best for Bulk/Family Storage
Larger families or serious preppers typically lean toward 5-gallon mylar bags, often paired with food-safe buckets for structural support. These bags hold significantly more food, which cuts down on the number of sealing sessions needed. For this size, 7 to 10 mil thickness is strongly recommended to handle the added weight and pressure.
5.3 Best Budget-Friendly Option (with caveats)
Budget bags can work for short-term needs or dry goods you’ll rotate through quickly. However, thinner budget options often sacrifice puncture resistance and seal reliability, so they’re best reserved for lower-stakes situations rather than critical, decade-long storage.
5.4 Best Premium Heavy-Duty Option
Premium 10 mil bags, often featuring reinforced seams and higher-grade metalized film, are ideal for anyone serious about long-term food storage bags that need to survive rough handling, pests, or extended storage in less-controlled environments like garages or basements.
6. Comparison Table: Bag Size, Mil Thickness, and Ideal Food Types
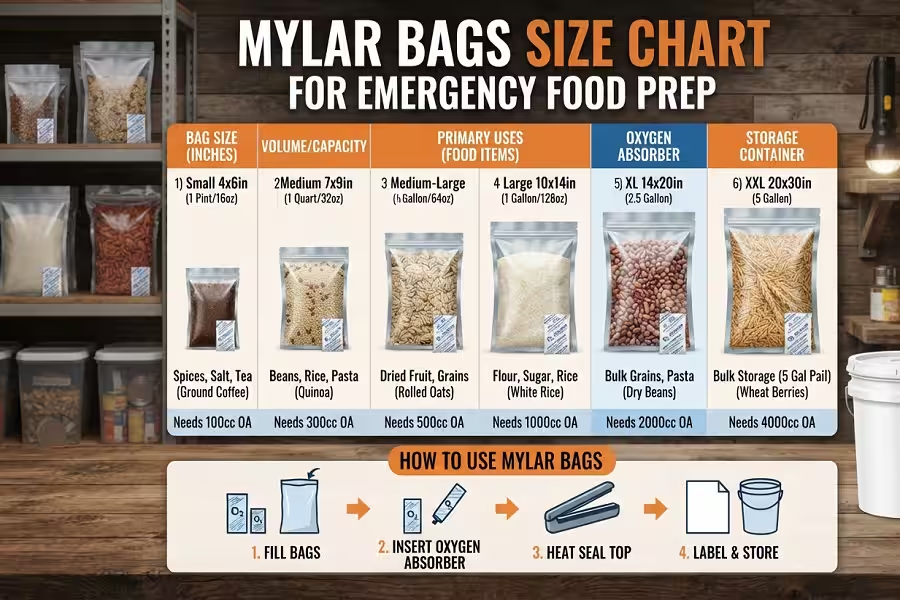
Choosing the right combination of bag size and mil thickness depends largely on what you’re storing and how long you need it to last. The table below breaks down common options side by side, so you can quickly match your needs to the right product. Use this as a quick-reference guide rather than a strict rulebook, since household size and storage conditions will always play a role too.
| Bag Size | Mil Thickness | Best For | Approx. Shelf Life |
|---|---|---|---|
| Quart (1 qt) | 5–7 mil | Spices, small snack portions | 5–10 years |
| Gallon (1 gal) | 5–7 mil | Rice, beans, pasta (small batches) | 10–15 years |
| 2-Gallon | 7 mil | Flour, sugar, oats | 15–20 years |
| 5-Gallon | 7–10 mil | Rice, beans, wheat (bulk) | 20–30 years |
| 5-Gallon Heavy-Duty | 10 mil | Bulk grains in high-risk storage areas (garages, basements) | 25–30+ years |
As shown above, thicker bags generally support longer shelf life, especially for bulk staples like rice and beans. Meanwhile, smaller quart-sized bags work best for items you’ll use up faster, such as spices. Matching bag size to your consumption habits helps prevent unnecessary waste once a bag is opened.
7. Industry Insight: Why Cheap Mylar Bags Ruin Long-Term Food Storage
Here’s an opinion that might ruffle a few feathers: cheap mylar bags are one of the most common reasons long-term food storage plans fail. I’ve seen it happen repeatedly. Someone spends hours portioning grains and beans, feels great about their preparedness, and then opens a bag five years later to find spoiled, moisture-damaged food. The culprit almost always traces back to bag quality, not the food itself.
Thin, bargain-bin bags often use lower-grade metalized film with inconsistent thickness across the sheet. This means some spots on the bag are weaker than others, creating invisible vulnerabilities. Add in poor sealing performance, since thin material doesn’t always melt evenly under heat, and you’ve got a recipe for micro-leaks that let oxygen and moisture creep back in over time.
There’s also the pest problem. Rodents and insects can chew through low-mil bags surprisingly easily, especially in garages or basements. A single small hole is enough to compromise years of careful preparation. Suddenly, that “bargain” purchase costs you the entire batch of food you were trying to protect, plus the ingredients, time, and oxygen absorbers you already used.
My honest recommendation? Spend the extra few dollars on 7 mil or thicker bags from reputable suppliers. When you calculate cost per year of reliable storage, premium bags almost always win. Cheap bags might save you money upfront, but they quietly gamble with years of your food security. For something this important, quality really shouldn’t be an afterthought.
8. Best Foods to Store in Long-Term Food Storage Bags
8.1 Grains, Legumes, and Dry Staples
Certain foods thrive in mylar storage thanks to their naturally low moisture content. Rice, wheat berries, and dried beans are among the most popular choices, largely because they can last decades when sealed properly with oxygen absorbers. These staples form the backbone of most long-term food storage plans for good reason: they’re affordable, versatile, and nutrient-dense.
Pasta, oats, and dried lentils also perform exceptionally well. Since these foods are already low in fat and moisture, they resist rancidity far better than items with higher oil content. This makes them ideal candidates for the best mylar bags for long-term food storage, especially when paired with proper mil thickness and sealing technique.
8.2 Foods That Store Exceptionally Well
Beyond grains and legumes, powdered items like sugar, salt, and powdered milk also store remarkably well in mylar. Sugar and salt don’t even require oxygen absorbers, since they’re naturally shelf-stable, though many people still include them for extra pest protection.
Flour deserves special mention, too. While it stores well, it benefits from slightly more attention to sealing quality because of its fine texture and higher surface area exposure to air. Freeze-dried fruits and vegetables round out this category nicely, offering variety and nutrition alongside your grain-based staples. Together, these foods create a well-balanced, long-lasting pantry foundation.
9. Common Mistakes to Avoid When Sealing Mylar Bags
Even with the best mylar bags for long-term food storage, small mistakes during the sealing process can undo all your hard work. Being aware of these pitfalls ahead of time will save you frustration and protect your investment.
Overfilling the bag. Leaving too little space at the top makes it difficult to create a clean, even seal. Always leave a few inches of room so your iron or sealer has enough material to work with.
Using the wrong number of oxygen absorbers. Too few won’t fully remove oxygen from larger bags, while randomly adding extra absorbers without checking capacity can also cause inconsistent results. Always match absorber size to your bag’s volume.
Rushing the sealing process. Moving the iron too quickly across the seam often creates gaps or weak spots. Slow, steady pressure produces a far more reliable, airtight seal.
Skipping the seal check. After sealing, always inspect the seam closely for bubbles, wrinkles, or uneven melting. A few extra seconds of inspection can catch problems before they become spoiled food later.
Reusing damaged bags. Even a small puncture or tear compromises the entire barrier. Once a bag shows visible damage, it’s best to start fresh rather than risk your food supply. Avoiding these mistakes ensures your long-term food storage bags perform exactly as intended for years to come.
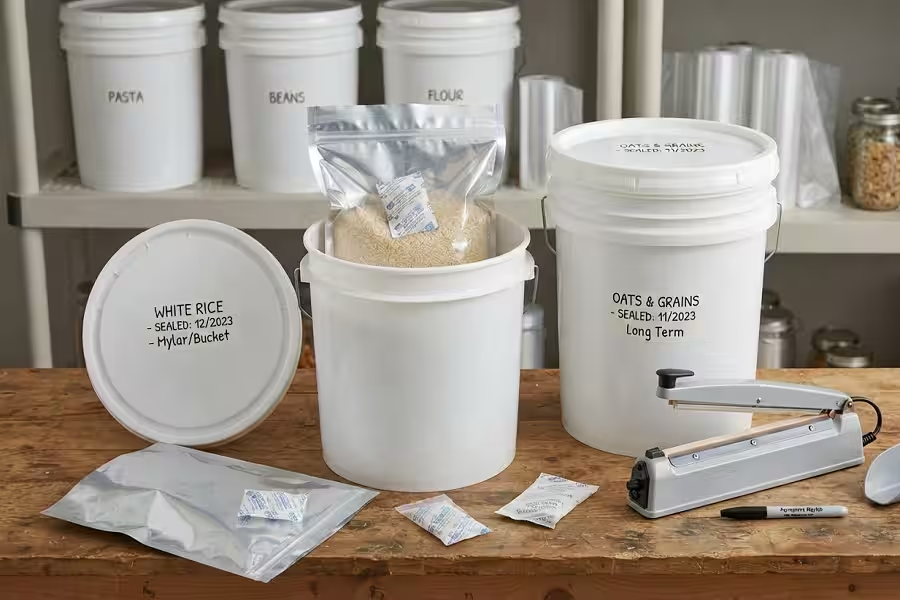
10. Proper Storage Conditions After Sealing
Sealing your mylar bags correctly is only half the equation. Where and how you store them afterward plays an equally important role in determining shelf life. Even the best mylar bags for long-term food storage can underperform if they’re kept in poor conditions.
Temperature consistency matters more than most people realize. Ideally, store your sealed bags in a cool location, somewhere between 50 and 70 degrees Fahrenheit. Avoid areas with frequent temperature swings, like uninsulated garages or attics, since fluctuating heat accelerates nutrient breakdown and can weaken seals over time.
Light exposure is another factor worth managing. Although mylar naturally blocks light, storing bags in a dark closet, basement, or under-stair pantry adds an extra layer of protection. Additionally, placing sealed bags inside food-safe buckets shields them from punctures, pests, and accidental crushing.
Humidity control rounds out the essentials. Damp basements or areas prone to flooding aren’t ideal storage spots, even with a solid mylar barrier. Elevating buckets off concrete floors and using moisture-resistant shelving can help further reduce risk. Finally, always label bags clearly with contents and packing dates. This simple habit makes rotation easier and ensures older items get used before newer ones, keeping your entire pantry organized and efficient.
11. Frequently Asked Questions (FAQ)
How do you seal mylar bags properly with an iron or straightener?
Place a thin cloth or piece of parchment paper over the open edge of the bag to protect it from direct heat. Set your iron or straightener to a medium-high setting, then press and slowly drag it across the seam in one steady motion. Avoid stopping in one spot too long, as this can melt through the material. Check the seal afterward for bubbles or gaps, and reseal if needed.
Do you really need oxygen absorbers with mylar bags?
For most foods, yes. Oxygen absorbers remove residual oxygen trapped inside the bag after sealing, which prevents oxidation, mold growth, and insect activity. While naturally shelf-stable items like sugar and salt can technically skip this step, most grains, legumes, and powdered foods require oxygen absorbers to achieve true long-term storage results.
What foods should you never store in mylar bags?
Avoid storing high-moisture or high-fat foods, such as fresh produce, dairy, meats, or oily items like nuts in bulk. These foods spoil quickly regardless of oxygen removal, and moisture can compromise the entire batch. Mylar bags work best with dry, low-fat, shelf-stable staples.
How long does food actually last in mylar bags?
Shelf life varies by food type, but properly sealed grains and legumes can last 20 to 30 years under ideal conditions. Factors like mil thickness, sealing quality, and storage environment all influence actual longevity, so results can vary between households.
12. Conclusion & Final Recommendations
Building a reliable long-term food storage plan doesn’t have to feel overwhelming once you understand the fundamentals. Choosing the best mylar bags for long-term food storage really comes down to a few key factors: adequate mil thickness, proper sealing technique, and smart pairing with oxygen absorbers. When these elements come together, you create a storage system capable of protecting your food for decades.
Throughout this guide, we’ve covered everything from understanding mil thickness to step-by-step instructions on how to use mylar bags and oxygen absorbers effectively. We’ve also explored which foods perform best, common mistakes to avoid, and why investing in quality long-term food storage bags pays off far more than cutting corners with cheap alternatives.
At the end of the day, food security is worth doing right. A few extra dollars spent on thicker, reputable bags today could mean the difference between a thriving pantry and a costly disappointment years down the road. Start with quality materials, follow proper sealing techniques, and store your bags in stable conditions. Your future self, and your family’s food security, will thank you for the effort.

Sarah Jenkins is a kitchen gear enthusiast and food preservation expert who tests and reviews containers, vacuum sealers, and home organization tools to help families keep their food fresh.